Installing Plaivid
In this guide, the steps for installing Plaivid based on Rocky Linux 9 are explained step-by-step.
Before starting the installation, ensure that you have read and completed all Installation Prerequisites and Pre-installation Checklist. Following the order of steps in this guide is essential for a correct and error-free installation.
Phase 1: Booting from ISO File and Starting Installation
In this phase, the server boots via the Plaivid Installation ISO file and its installation environment runs.
In this guide, the booting process via HPE iLO Virtual Media is explained. If needed, you can also use DVD or USB Bootable instead of iLO to launch the server.
Connecting to iLO Console
To access the server's management console, follow these steps:
- Connect to the iLO management interface via web browser.
https://<iLO-IP-Address>
-
Enter the Username and Password.
-
Run the server console from the following menu:
Remote Console → Launch
For HPE Gen9 servers and older versions, it is recommended to use HPE iLO Remote Console instead of the HTML5 Console.
Mounting the ISO File
After opening the Remote Console, mount the ISO file onto the server.
- From the following menu, enter the virtual media management section:
Virtual Drives
or
Virtual Media
-
Select CD/DVD-ROM option.
-
Click on Browse and select the Plaivid ISO file from your local system.
-
Click on Mount or Connect.
Checking Mount Status
After successfully connecting the ISO file, the following message should be displayed:
CD/DVD-ROM mounted successfully
Before continuing with the steps, ensure that the ISO file has been successfully mounted; otherwise, the server will not be able to boot from the installation file.
Restarting the Server and Booting from ISO
After mounting the ISO file, restart the server again.
- From inside iLO, select the following path:
Power → Reset
-
Wait for the server to Restart.
-
If the Boot Order is correct, the system will automatically boot from the ISO file.
-
After a few moments, the Plaivid boot screen will be displayed, and the installation process will begin.
If the system booted from the hard disk and did not enter the installation environment, first check that the ISO file is still mounted, and then control the server's Boot Order.
Phase 2: Beginning Operating System Installation
Selecting Installation Option
After the server boots via the Plaivid Installation ISO, the boot menu is displayed. This menu includes several installation methods, each designed for different scenarios.
Install Plaivid (Virtual Machine)
This option is the Standard and Recommended Method for installing Plaivid. In this mode, the standard version of QEMU/KVM available in the base operating system distribution is used.
This method is suitable for most deployment scenarios, including:
- Installation on physical servers
- Enterprise environments and data centers
- Laboratory environments
- Virtual machines
If you do not specifically need the capabilities of Avid's custom QEMU/KVM version, choose this option.
Install Plaivid (Desktop) ⭐ Recommended
In this mode, the proprietary version of PVM QEMU/KVM developed and customized by Avid is used.
This option is suitable for scenarios that require advanced features of the SPICE graphical console and desktop management of virtual machines; such as:
- Installation on Desktop systems
- Workstations
- Environments where direct graphical access to virtual machines is important
The difference between this mode and Virtual Machine is the use of the proprietary version of QEMU/KVM and optimized support for SPICE graphic capabilities.
For most installations, choosing Install Plaivid (Virtual Machine) is recommended.
Test Media & Install Plaivid
This option checks the health of the ISO file and installation media before starting the installation, and upon confirmation, begins the Plaivid installation process.
Using this option is recommended under the following conditions:
- The ISO file has been written to DVD or USB Flash Drive.
- There is a possibility of corruption in the ISO file or installation media.
- You encountered errors reading files or unexpected stops during installation.
- You want to verify the complete integrity of the installation media before installing.
Running this check increases the time it takes to start the installation process, but it makes no difference in how or the result of the installation.
Install Plaivid in FIPS Mode
This option installs Plaivid with FIPS (Federal Information Processing Standards) enabled.
In this mode, the system uses only encryption algorithms and settings approved by the FIPS standard. This standard is usually used in government organizations, sensitive centers, and environments that are required to comply with security requirements and compliance (Compliance).
This option should only be selected if using FIPS is one of the organization's security requirements. Activating FIPS may cause some encryption algorithms, protocols, or software incompatible with this standard to become disabled.
Selecting Installation Option
On the boot screen, select the following option:
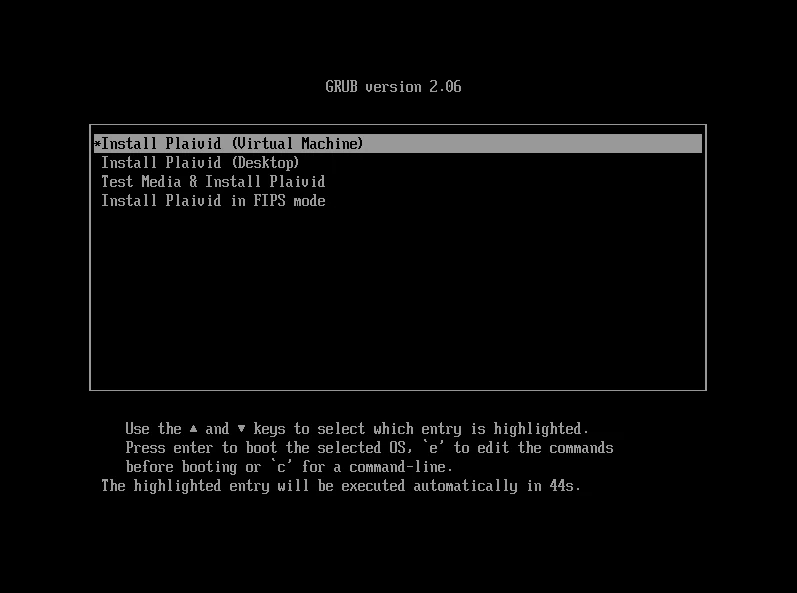
After selecting the installation option, the process of loading installation files begins. At this stage, required files are loaded from the installation media, and the Plaivid installation environment is prepared.
The duration of this stage depends on factors such as server processing power, amount of memory (RAM), disk speed, and type of installation media (Virtual Media, USB Flash Drive, or DVD/CD) and may take several minutes.

Wait until you enter the operational environment of the installation.
If no changes are observed on the screen after a few minutes, wait a bit longer; as loading time may vary depending on hardware and installation media type.
If the installation process still hasn't started after waiting, check the following items:
- Plaivid Installation ISO file is correctly Mounted.
- ISO file or installation media (Virtual Media, USB Flash Drive, or DVD/CD) is healthy.
- Server has access to installation media and the boot process has been performed from that same media.
Selecting Installation Language
After loading the installation environment, the language selection page is displayed.
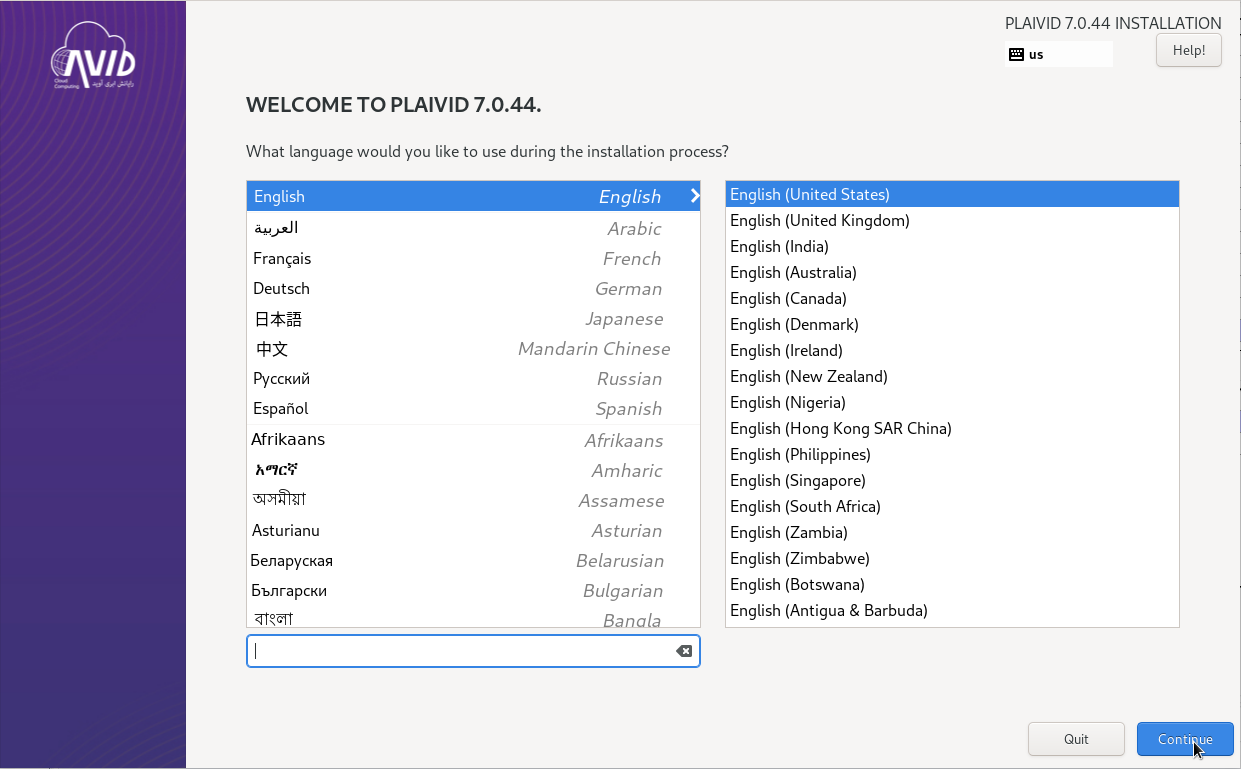
- Select the desired language.
- In most scenarios, English (United States) is recommended.
- After selecting the language, click on Continue.
The selected language pertains to the installation environment and the operating system and does not affect the language of the Plaivid user interface.
Installation Summary
After selecting the language, the Installation Summary page is displayed.
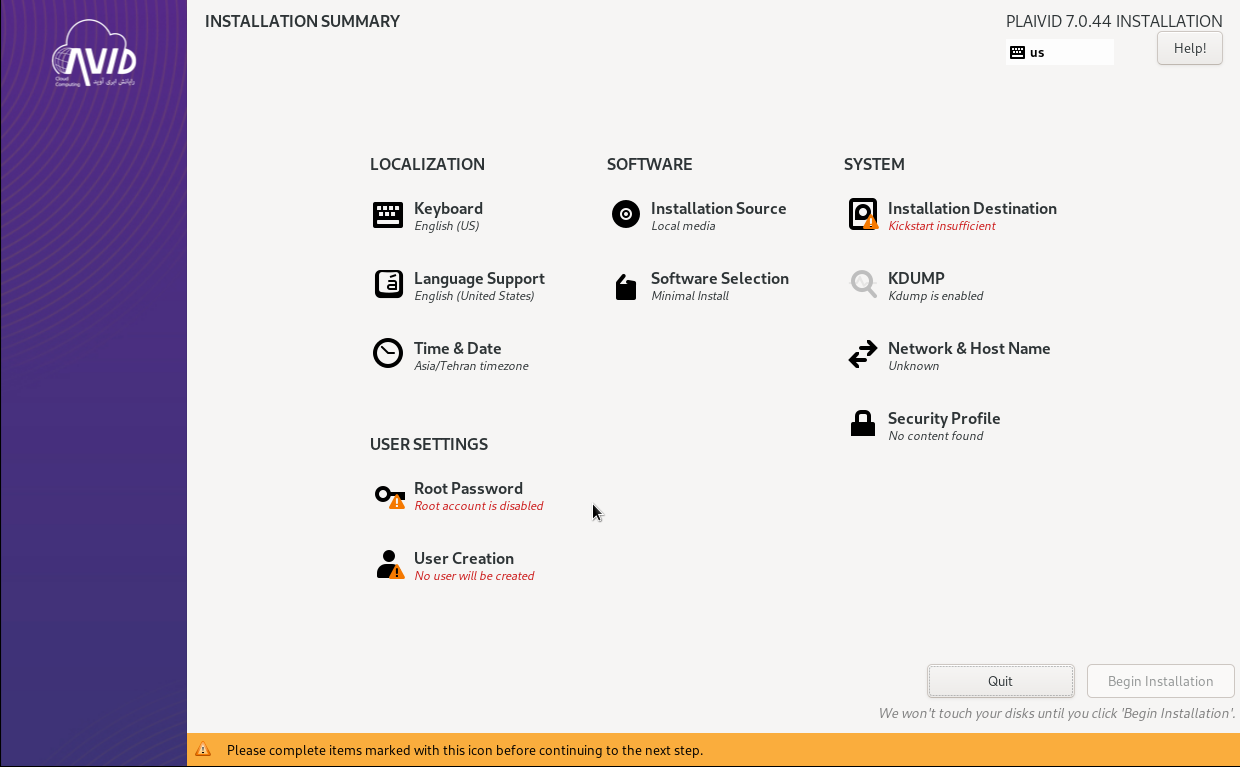
At this stage, various sections of installation are visible and configurable.
Before starting the installation, review the following:
- Installation Destination
- Root Password
If all mandatory sections are completed, the Begin Installation button will be activated.
Partitioning and Storage Configuration
- First, determine whether this host will only be Plaivid or multiple products (like Inad, Fylad) will be deployed on it; this decision determines whether
/varis separated or not. - If only Plaivid is being installed, there is no need to separate
/varfrom/. - The suggested Production structure includes three independent Logical Drives (OS, VAR, DATA).
- Partitions
/,/varare of type LVM and partitions/boot,/boot/efi,biosboot,/DataStoreare of type Standard Partition. - The minimum required space for the OS disk (excluding
/DataStore) is approximately 152GB (details in the "Minimum Required Space" section).
Notes Before Partitioning
Architecture Decision: Separating /var
Before starting the practical partitioning steps, it must be determined whether /var should be separated independently or not. This decision is based on the final service that is supposed to be deployed on this host, not a fixed law for all installations.
| Installation Scenario | Decision |
|---|---|
| Besides Plaivid, another service (like Inad, Fylad, or any other product) is supposed to be deployed on this host | / and /var should be created on two independent Logical Volumes (e.g., VG_OS and VG_VAR); both with Device Type of LVM. |
| This host will only be Plaivid (without any other product) | There is no need to separate /var; /var remains a subset of /. However, Device Type of the / partition must still be LVM, not Standard. |
Separating /var is for isolating space between the operating system and variable data of products, not for Redundancy. If products like Inad or Fylad produce a large volume of logs or variable data and /var is not separated, running out of space could take down the entire / and consequently the entire operating system. With an independent Logical Volume for /var, this risk is limited to that Volume only, and the rest of the system remains healthy.
Basic Concepts

What is RAID?
Learn the concept of RAID

What is Logical Drive?
Explanation of the concept of Logical Drive

What is LVM?
Explanation of the concept of LVM
Swap
In Enterprise deployments, using Swap is not recommended, and it is not considered by default in the standard Plaivid architecture.
The reason for this is that prior to project execution, the CloudAvid team reviews the organization's needs and provides an Infrastructure Sizing document. In this document, required resources including CPU, RAM, and Storage are determined such that the server can execute the expected workload stably without relying on Swap.
Since Plaivid is a virtualization platform, in case of memory shortage and use of Swap, the operating system transfers part of memory data to storage space (Disk). This process causes a significant increase in latency, and depending on the storage type (especially HDD or slower storage), it can noticeably reduce the performance of virtual machines and other Workloads.
| Environment Type | Use of Swap | Description |
|---|---|---|
| Enterprise / Production Environment | ❌ Not Recommended | Hardware capacity is determined according to CloudAvid design document, and the system should not rely on Swap. |
| Lab, Dev, or Testing Environment | ✅ Optional | If needed, Swap can be used to increase system stability. |
In Enterprise infrastructures, memory shortages should be resolved by increasing RAM or correcting hardware capacity, not by using Swap. Using Swap in virtualization environments usually reduces system performance.
If you are installing Plaivid in testing, educational, or non-Enterprise environments, you can use Swap according to your own needs. In these scenarios, creating Swap usually poses no problem and can even help increase system stability in conditions of memory shortage.
Starting Partitioning Operations
Selecting Storage Space
From the Installation Summary page, select Installation Destination.

In this section:
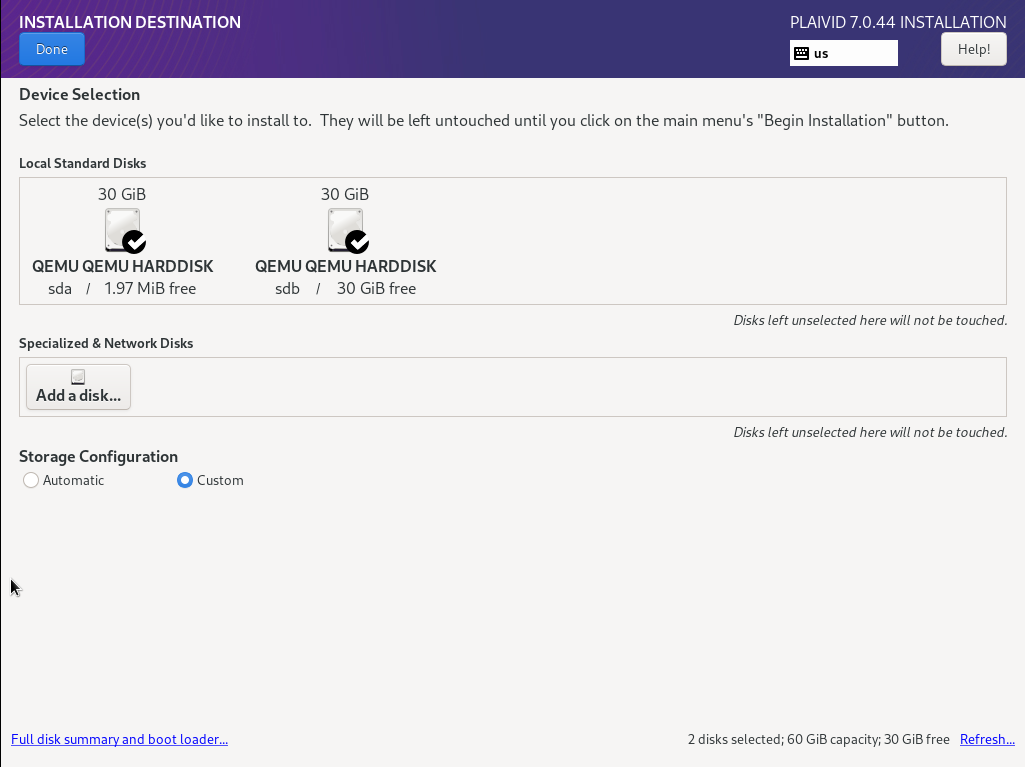
- Select the disk or RAID Array desired for operating system installation.
- Ensure the correct disk is selected.
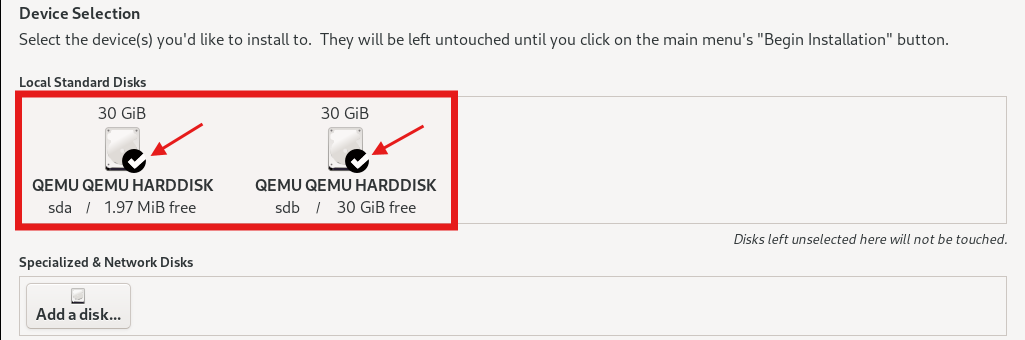
- According to the "Introduction and Prerequisites" document, for the best experience, the OS must be installed on an SSD.
If the wrong disk is selected, all information existing on it will be deleted during the installation process.
Entering the Storage Configuration Environment
Selecting Custom Storage Configuration
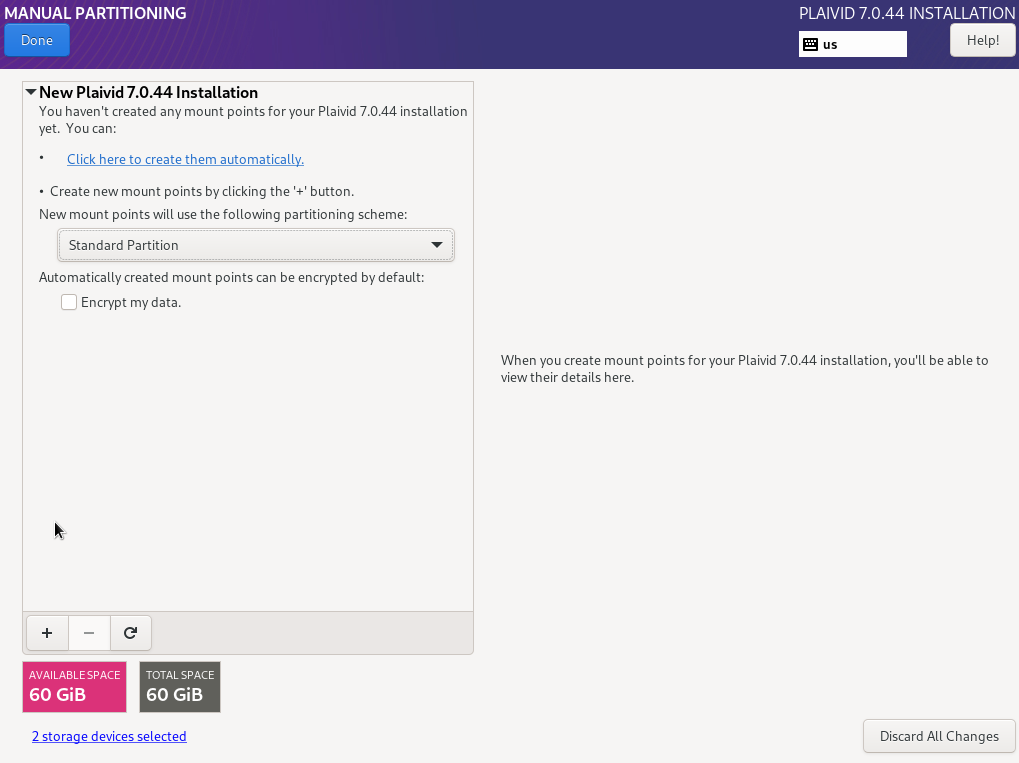
- In the Storage Configuration section, select Custom.

- Click on Done.

- You will enter the Manual Partitioning page.
Selecting LVM as the default structure
At the bottom of the page, in New mount points will use the following partitioning scheme, select LVM.

In the Plaivid installation standard, only partitions / and /var (if separated, according to the decision of the previous section) are created as LVM.
Other partitions including /boot, /boot/efi, biosboot, and /DataStore must be created as Standard Partitions.
Creating Partitions
To create each Mount Point:
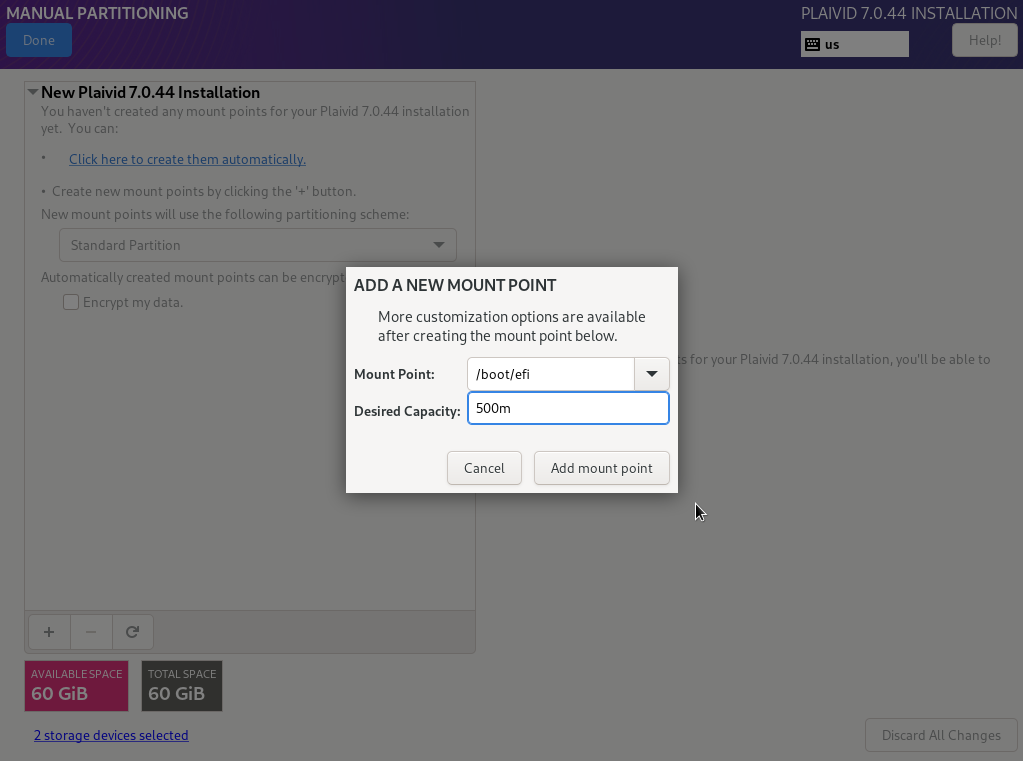
- Click on + (Add mount point).

- Enter Mount Point and Desired Capacity values according to the Standard Partition Structure table(mentioned below).
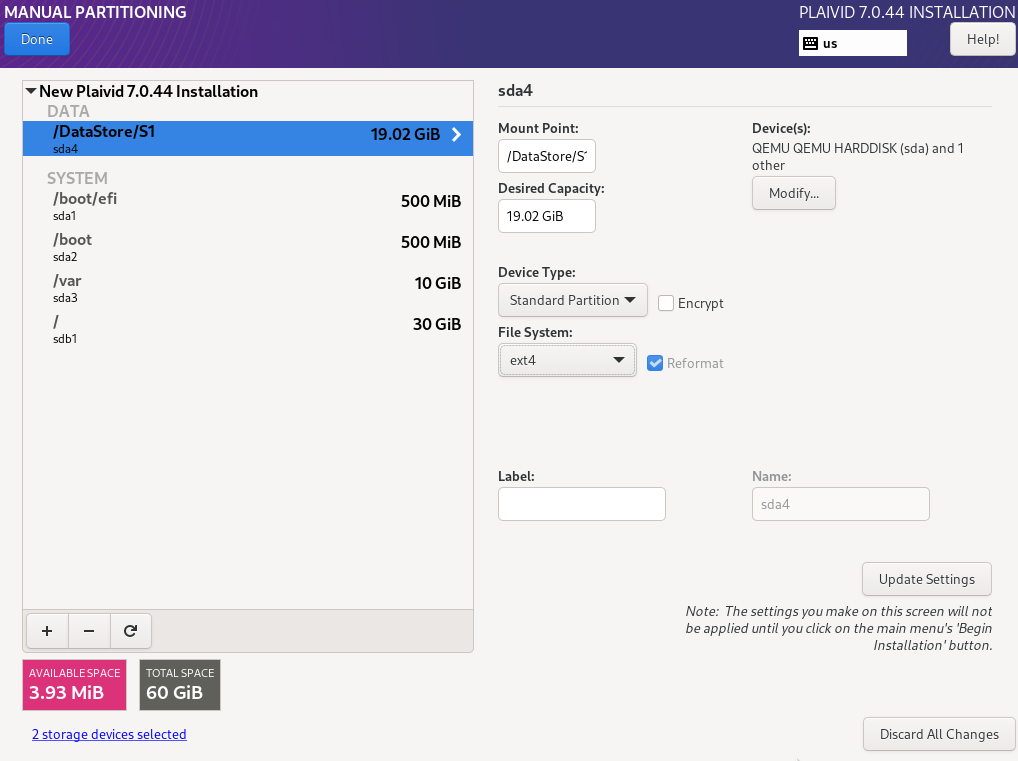
- Select the created partition.
-
Apply its settings according to the table below.
-
Click on Update Settings.
Standard Partition Structure
Plaivid Structure
If only Plaivid is being installed.
| Mount Point | Desired Capacity | Device Type | File System | Volume Group | Logical Drive |
|---|---|---|---|---|---|
/boot/efi | 1GB | Standard | EFI System Partition | — | OS |
biosboot | 2MB | Standard | biosboot | — | OS |
/boot | 1GB | Standard | ext4 | — | OS |
/ | 150GB | LVM | ext4 | VG_OS | OS |
/DataStore | Remaining Space | Standard | ext4 | — | DATA |
Inad, fylad,... Structure
If other services are being installed on Plaivid.
| Mount Point | Desired Capacity | Device Type | File System | Volume Group | Logical Drive |
|---|---|---|---|---|---|
/boot/efi | 1GB | Standard | EFI System Partition | — | OS |
biosboot | 2MB | Standard | biosboot | — | OS |
/boot | 1GB | Standard | ext4 | — | OS |
/ | 50GB | LVM | ext4 | VG_OS | OS |
/var | 100GB | LVM | ext4 | VG_VAR | VAR |
/DataStore | Remaining Space | Standard | ext4 | — | DATA |
It is not implied that stating remaining space should be allocated to DataStore means this space is determined randomly or without criteria.
Since the installation process is performed organizationally, the organization is obligated to provide the required Storage capacity according to the Server Resources Document. In this document, considering the number of virtual machines and users, the amount of space needed for DataStore is precisely specified.
Therefore, if all installation steps and resource provisioning are done according to provided documents and standards, the remaining space will be the same value suggested and calculated in the Server Resources Document, and there is no need for manual or arbitrary determination of this amount.
/= 50GB: This space is considered for OS binaries, installed packages, space needed for future updates, and kernel Rollback possibilities so the OS doesn't face space shortage./var= 100GB: This partition hosts logs, cache, and variable data of products (Inad, Fylad, etc.) which grow over time; more space is considered to prevent sudden filling up.
Due to the reason above, this is just a suggestion, and depending on the actual volume of logs and deployed products, the CloudAvid team might recommend a different amount for this specific project.
You must create each Mount Point with its corresponding Desired Capacity according to the table.
For the first partition, create only one of the following options:
/boot/efifor UEFI-based serversbiosbootfor Legacy BIOS-based servers
For the /DataStore partition, leave the Desired Capacity empty so that the entire remaining space of the Logical Drive related to DataStore is allocated to it.
The final DataStore capacity must match the design and the value suggested by the CloudAvid team.
Converting Partition from LVM to Standard
In the above structure, some partitions are in Standard mode. Since the default mode is set to LVM, when creating non-LVM partitions, you must change their type.
To do this:
-
Select one of the following partitions:
/DataStore/boot/boot/efiorbiosboot
-
In the Device Type section, change LVM to Standard Partition.
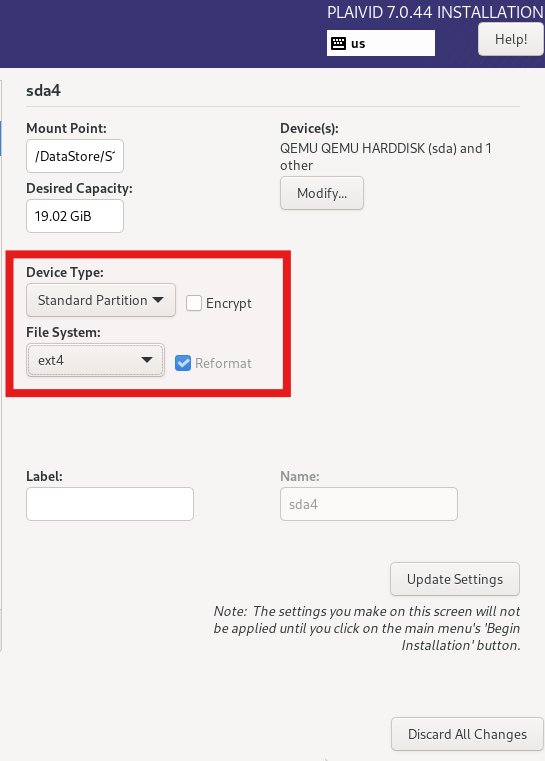
- In the File System section, select ext4.
Only the
/boot/efipartition instead of ext4 must be of type EFI System Partition, and in Legacy mode, the first partition must be biosboot.
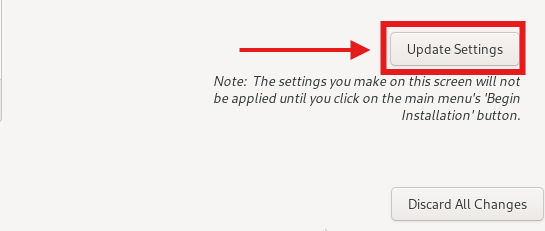
- Click on Update Settings.
Why ext4 and not XFS?
Although XFS is the default for many RHEL family distributions, in the Plaivid installation standard, ext4 is used; because ext4 has more common and stable tools for resizing partitions (especially Shrinking) in combination with LVM, recovers easier, and has shown greater compatibility with current monitoring and backup tools in the collection.
Suggested Logical Drive Structure
In the Production environment, it is recommended that when configuring RAID, three independent Logical Drives be created.
| Logical Drive | Usage |
|---|---|
| OS | Operating System |
| VAR | Variable files of system and logs |
| DATA | Virtual Machine DataStore space |
If only plaivid is supposed to be installed, there is no need to create Logical Drive VAR
This structure causes I/O operations of the OS, logs, and virtual machines to be independent of each other.
If the server has only one RAID or one Logical Drive, installation is still possible. In this case, all Volume Groups will be created on that same Logical Drive; however, in the Production environment, it is recommended to observe the above structure.
Selecting the Appropriate Logical Drive
If the server has multiple RAIDs or multiple Logical Drives, before creating any partition, you must correctly select its storage location.
OS-related partitions including /, /boot, /boot/efi, biosboot must be created on SSD-based RAID or Logical Drive so that the OS benefits from maximum performance, boot speed, and suitable operation.
To do this:
- Select the created partition.
- Click on Modify.
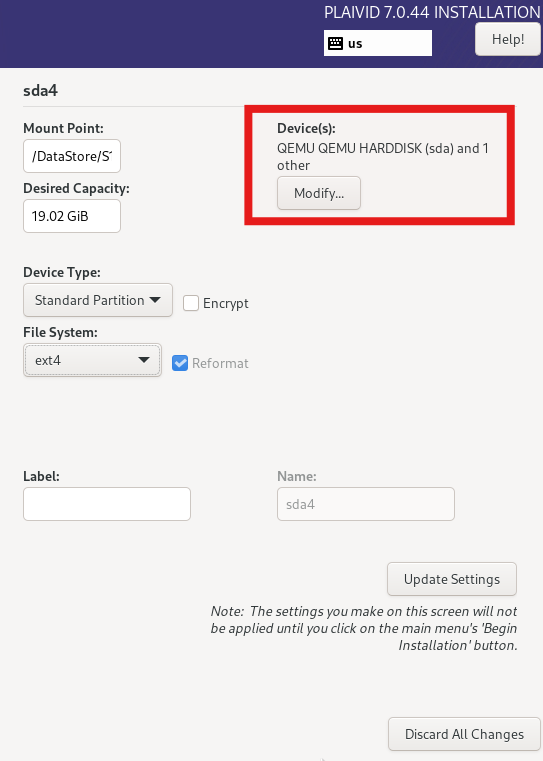
- In the Device or Disk section, select the desired Logical Drive.
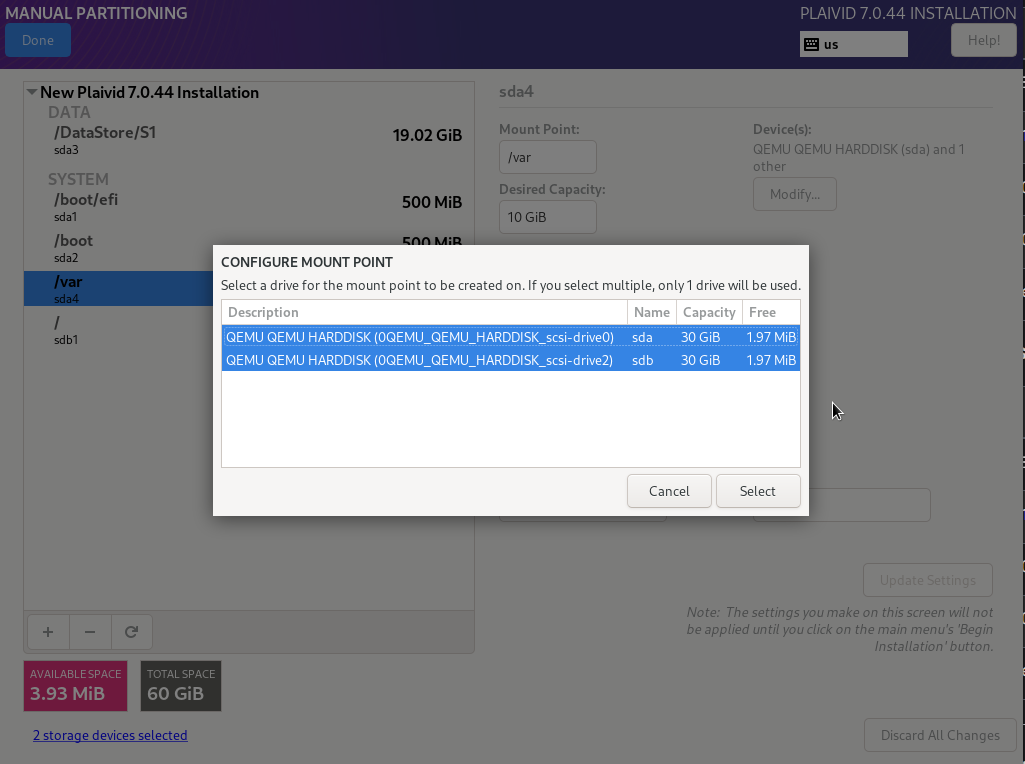
In this section, you cannot modify / and /var.
Since partitions / and /var are created based on LVM, it is necessary for each of them to be placed on their dedicated Logical Volume (LV) in the relevant Volume Group (VG). This structure, in addition to increasing flexibility in storage space management, provides the possibility of development, resizing, and maintenance of partitions in a standard way.
The method of creating Volume Group and Logical Volumes related to these partitions will be fully detailed in the next section.
Suggested Structure
| Partition | Logical Drive |
|---|---|
/boot/efi | OS |
/boot | OS |
/ | OS |
/var | VAR |
/DataStore | DATA |
If the system has multiple Logical Drives, definitely place OS partitions (/boot, /boot/efi, /) on SSD or OS Logical Drive. Placing these partitions on Data RAID or Storage RAID will reduce system performance.
Creating Volume Group
Since only partitions / and /var (according to the "Architecture Decision" section) are created as LVM, it is necessary to create appropriate Volume Groups for them.
To create a new Volume Group:
- Select the desired partition.
- Click on Modify.
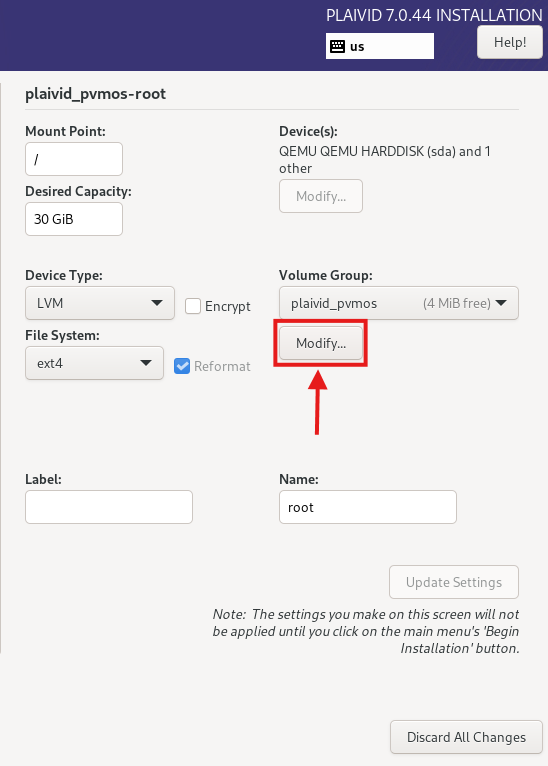
- Enter a suitable name. Example:
| Volume Group | Creation Location |
|---|---|
| VG_OS | On OS Logical Drive |
| VG_VAR | On VAR Logical Drive |
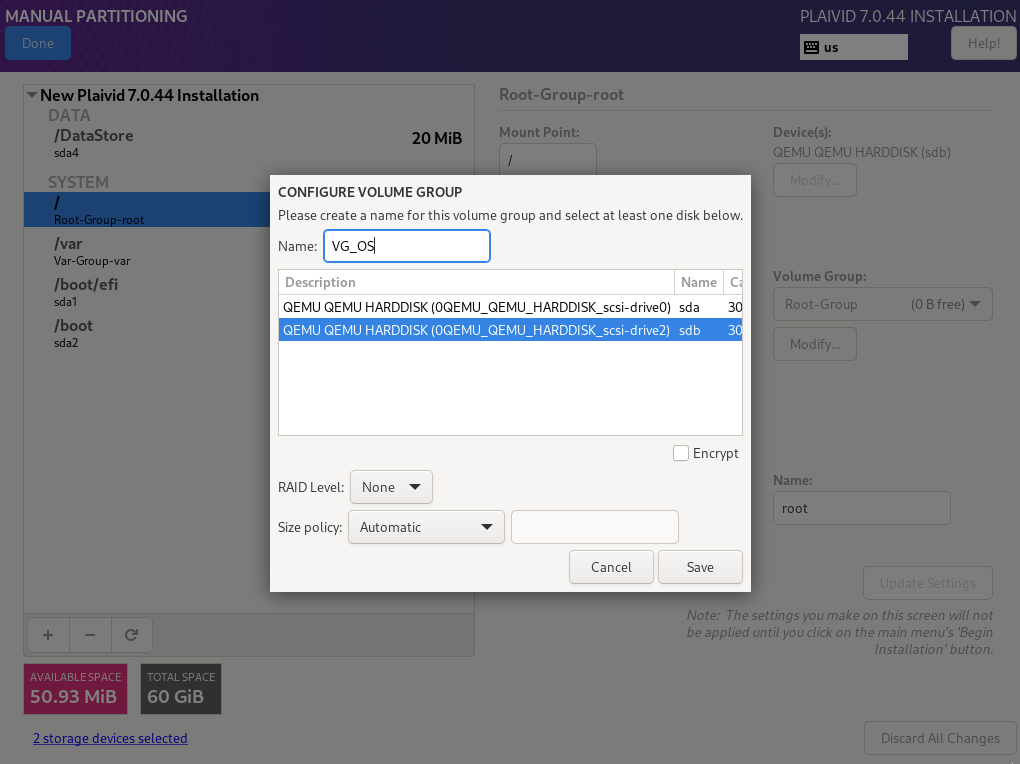
Set Size Policy to As large as possible.
- If you have two LVM partitions, you must create a new Volume Group for the next partition.
That is, we proceed for the first partition through modify, and for the next partition through creating a new Volume Group.
- Click on Create a new Volume Group opposite the Volume Group option.
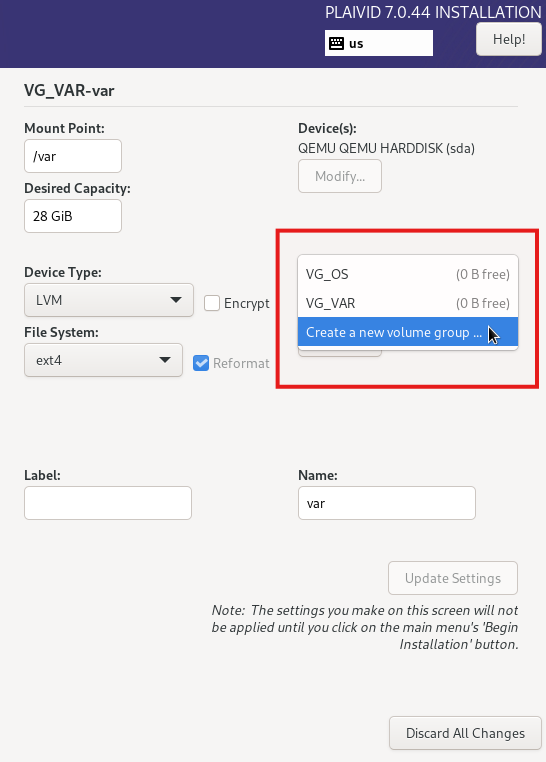
- When creating Volume Group (VG) for each Mount Point, create it on the exclusive Logical Drive of that section. For example, if you are creating the Volume Group related to
/var, you must create it on the Logical Drive designated for/varand refrain from creating it on other Logical Drives.
If you only have one Logical Drive, both Volume Groups will be created on that same Logical Drive.
Each Volume Group must reside only on one Logical Drive and should not be shared among multiple Logical Drives.
Minimum Required Disk Space
Before starting the installation, consider the sum of fixed partition spaces (excluding /DataStore which takes up the remaining space):
Plaivid Structure
If only Plaivid is being installed.
| Partition | Space |
|---|---|
/boot/efi | 1GB |
/boot | 1GB |
/ | 150GB |
Inad, fylad,... Structure
If other services are being installed on Plaivid.
| Partition | Space |
|---|---|
/boot/efi | 1GB |
/boot | 1GB |
/ | 50GB |
/var | 100GB |
This figure is the minimum required space on the OS Logical Drive, before adding /DataStore space.
Final Review Before Installation
Attention: Before applying changes and continuing the installation steps, carefully review and confirm the configurations below.
Partitioning Structure
In case of using UEFI
Only Plaivid
| Mount Point | Size | File System | Device Type |
|---|---|---|---|
/boot/efi | 1GB | EFI System Partition | Standard Partition |
/boot | 1GB | ext4 | Standard Partition |
/ | 150GB | ext4 | LVM |
/DataStore | Remaining Space | ext4 | Standard Partition |
Services on Plaivid
| Mount Point | Size | File System | Device Type |
|---|---|---|---|
/boot/efi | 1GB | EFI System Partition | Standard Partition |
/boot | 1GB | ext4 | Standard Partition |
/ | 50GB | ext4 | LVM |
/var | 100GB | ext4 | LVM |
/DataStore | Remaining Space | ext4 | Standard Partition |
In case of using Legacy BIOS
Only Plaivid
| Mount Point | Size | File System | Device Type |
|---|---|---|---|
biosboot | 2MB | biosboot | Standard Partition |
/boot | 1GB | ext4 | Standard Partition |
/ | 150GB | ext4 | LVM |
/DataStore | Remaining Space | ext4 | Standard Partition |
Services on Plaivid
| Mount Point | Size | File System | Device Type |
|---|---|---|---|
biosboot | 2MB | biosboot | Standard Partition |
/boot | 1GB | ext4 | Standard Partition |
/ | 50GB | ext4 | LVM |
/var | 100GB | ext4 | LVM |
/DataStore | Remaining Space | ext4 | Standard Partition |
Storage Requirements
- Drive Allocation: If multiple Logical Drives exist, ensure each partition is placed exactly on its correct logical drive.
- OS Location: All OS-related partitions must be configured exclusively on high-speed SSD (OS Logical Drive) disks.
-
/varDecision: The decision to separate or not separate/varbased on the final host service must be adopted according to the table at the beginning of the document.
Confirming and Applying Changes
- Click on Done at the top of the page.

- The displayed warning in the orange box informs you of the deletion and formatting of all data existing on the disk.
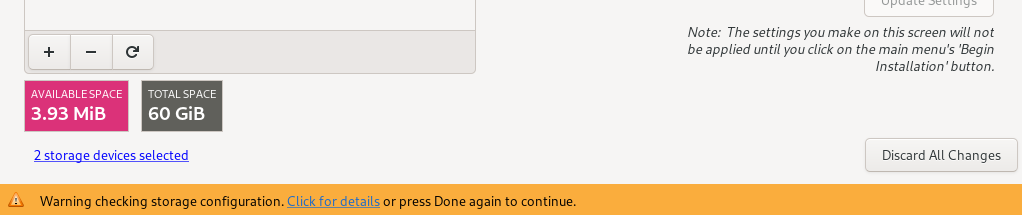
-
Click on Done again.
-
Summary of Changes window will be displayed showing all proposed changes.
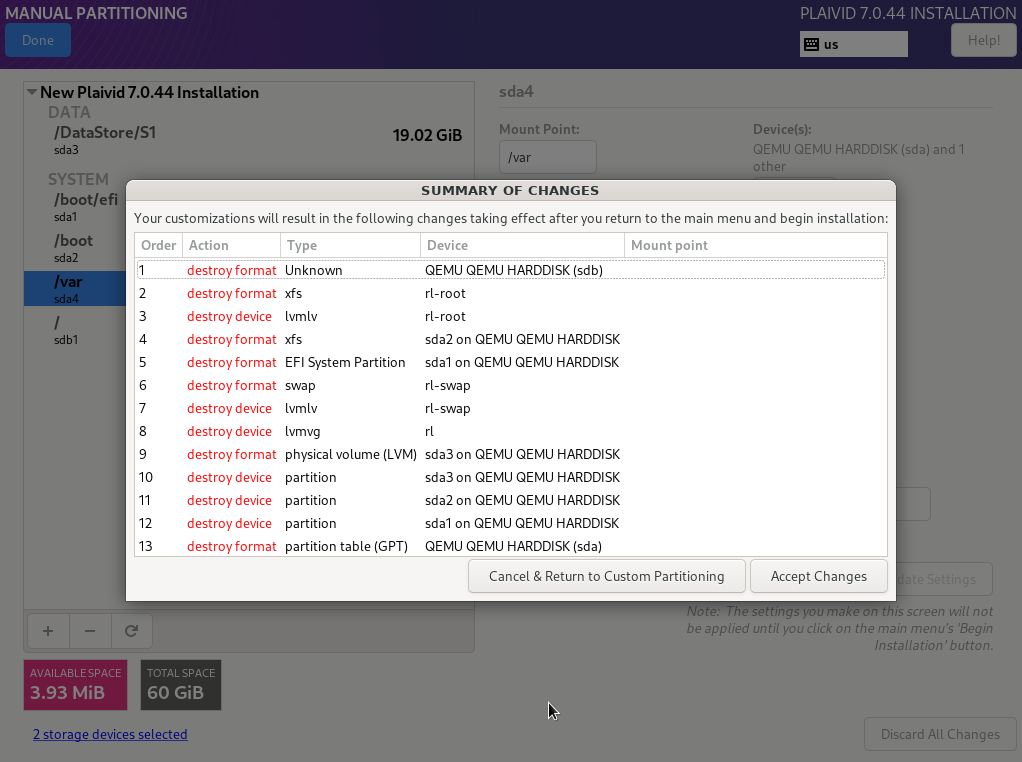
The changes displayed at this stage, once confirmed, will be applied to the disk and reverting them will not be easily possible. Before proceeding, ensure the correctness of the selected disk, selected Logical Drive, and final partition structure.
- Click on Accept Changes.
- After applying changes, you will return to the Installation Summary page.
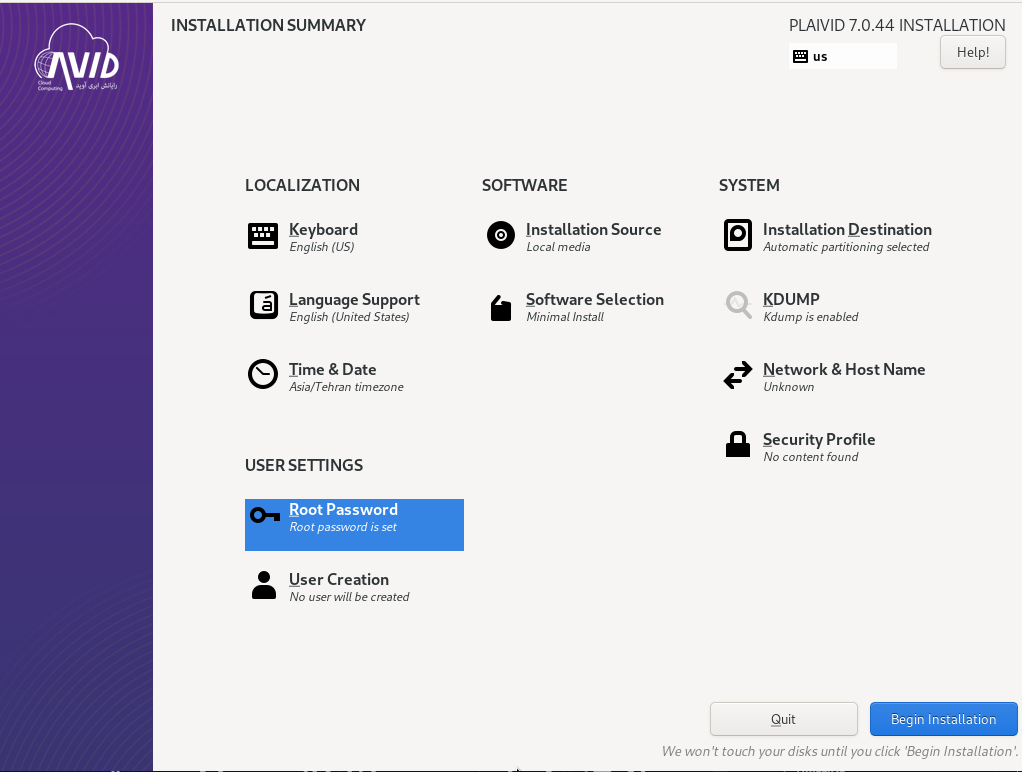
Considerations before continuing
Not enough disk space?
Before starting, compare the minimum required space amount with disk capacity or Logical Drive. In case of shortage, you can reduce the size of /DataStore or coordinate with the CloudAvid team to review disk capacity.
Wrong disk selected?
As long as you haven't clicked on Accept Changes, no change has been applied to the disk, and you can return to the Installation Destination page and select the correct disk.
After selecting Accept Changes, changes will be applied to the disk, and restoring them will not be easy.
Don't know the number of Logical Drives?
Query from the infrastructure team or RAID configuration documentation. If there is only one Logical Drive, proceed according to the Suggested Logical Drive Structure section.
Can /var be separated from / later?
No, doing this after installation is a complex and risky process. It is recommended that this decision be made before starting installation and based on the final service of the server.
Setting Root Password
From the Installation Summary page, select Root Password.
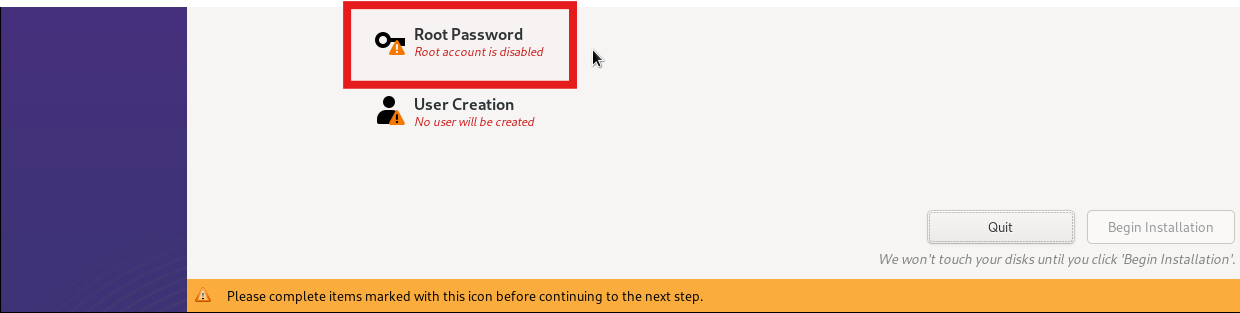
In this section:
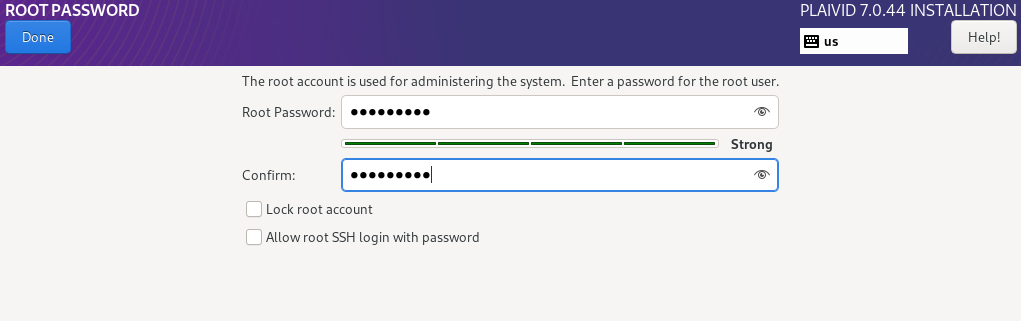
- Enter the password for user root.
- Enter the same password again for confirmation.
- Click on Done.
Use a strong password including uppercase letters, lowercase letters, numbers, and special characters.
In operational environments, using simple or guessable passwords is strongly discouraged.
Starting Installation
After completing all necessary settings, return to the Installation Summary page.
If there are no incomplete sections, the following button will be activated:

By selecting this option, the operating system installation process will begin.
During installation, operating system files, software packages, and required Plaivid components will be automatically installed on the server.
The installation time may vary depending on the server's hardware specifications and storage type (SSD or HDD).
Phase 3: Completing Installation and System Restart
After completing the installation process, the system will be ready for its first boot.
Completion of Installation Process
After copying files and full installation of the operating system, the message Installation Complete is displayed.
At this stage, the server will restart automatically.
Before restarting the server, be sure to disconnect the installation file from the system; otherwise, the server may boot from the ISO file again and the installation process may start from the beginning.
Depending on the installation method, perform one of the following actions:
-
In case of using iLO Virtual Media:
- Enter the Virtual Media or Virtual Drives section.
- Unmount or Disconnect the ISO file.
-
In case of using USB or DVD:
- Eject the installation media from the server.
The system will restart and this time will boot from the installed disk.
If the ISO file is not Ejected (disconnected) from the virtual machine at the right time, after rebooting, the server may enter the installation environment again instead of booting from the installed operating system. In this condition, first Eject (remove) the ISO file from the virtual drive, then manually Reboot the server so that booting occurs from the operating system disk.
After a few moments, the PVM OS login page will be displayed.

Initial Configuration (Sbone)
After the first boot and Login to the server, the Sbone tool executes automatically and displays the initial system configuration page. At this stage, it is necessary to complete the system's initial settings through Sbone.
Sbone is Plaivid's initial configuration tool that performs basic system settings including Hostname, Network, Time Zone, and other required settings.
First Login to System
On the login page, enter the system with user root.
login: root
Password: <Root Password>
The password is the same value you set during the installation step for user root.
After logging in to the server, the Sbone tool will execute automatically and the initial system configuration environment will be displayed. At this stage, perform the necessary initial settings through Sbone.
Setting Hostname
First, enter the hostname of the server.

As an example:
pvm-node1
or
Abbreviation of Organization Name
Selecting Time Zone
In the next step, select the system's time zone.

For servers located in Iran, select the Asia/Tehran option.
Identifying and Naming Network Cards
At this stage, all physical network cards are identified and displayed.

When configuring networks, specify the role of each network card.
- NIC1 (Management) for management network
- NIC2 and other cards for virtual machine network (VM Network)
To select the Management card, select (x) all cards that are intended for virtual machine traffic with the Space key.

The card that is not selected will be considered as the Management interface.
Next, we need to Rename each network card sequentially to the following names:
NIC1
NIC2
NIC3
NIC4
...
- Select the desired network card.
- Click on Change Name.

- Change the name according to the list above.

Setting Up Management Network
At this stage, enter Manage network information.
Settings are applied and saved on the Network Card that was not selected in the previous step and whose status is shown with ( ).

Example:
IP: 172.30.30.10
Netmask: 24
Gateway: 172.30.30.1

At this stage, leave the values related to PVM Redundant Interface empty.
After completing the information, select the Finish option to apply the settings.
Starting Services
After completing the initial configuration in Sbone, a script runs automatically. This script asks for your confirmation to Start and Enable the system's necessary services on the server. Upon confirmation, services will be launched and activated for execution in future boots.

To confirm, press the Enter key.
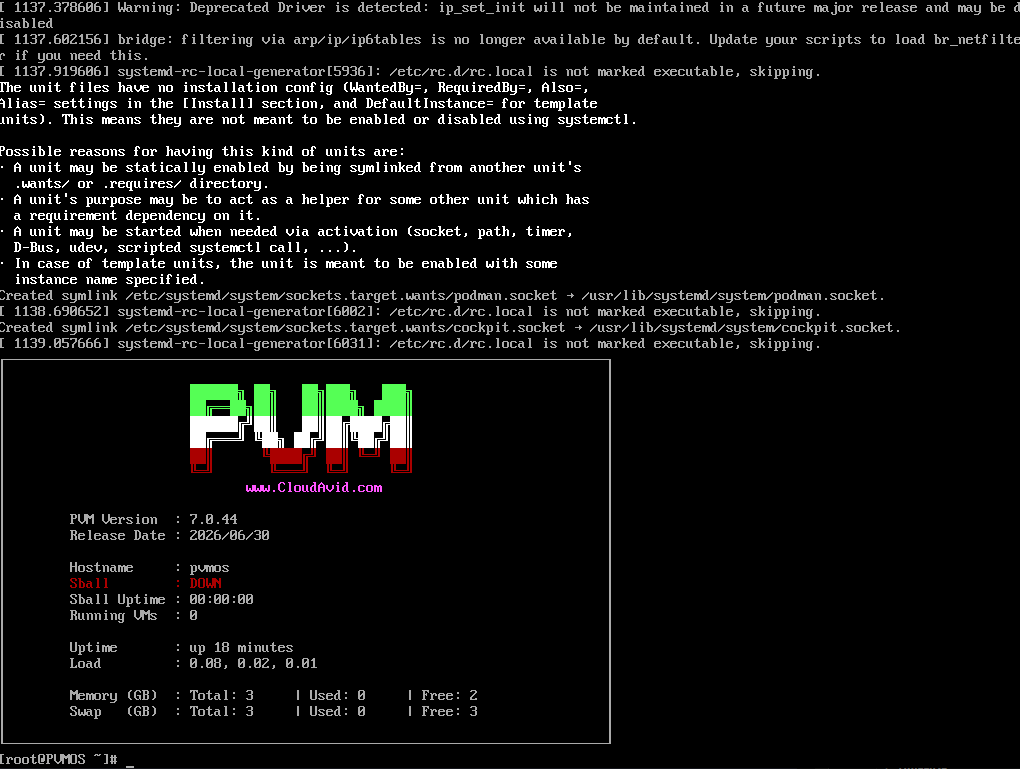
The script runs vital services, and then you will enter the server command line environment.
Required Executable Files
After completing Plaivid installation, the executable files needed for connecting and managing some services are located in the path below:
/root/extras
This folder includes the following files:
| File | Description |
|---|---|
| PVMManager.exe | Software for managing and connecting to PVM infrastructure |
| InadViewer.exe | INAD Viewer software for connecting and using INAD service |
If needed, you can download these files from the above path and install them on your system.
Starting sballd Service
After completing the installation, to enable virtualization capabilities and prepare the host for providing services, it is necessary to start the sballd service. As long as this service is not in the Up status, using capabilities such as host management, running virtual machines, and other dependent services will not be available.
Initial Startup
If this is the first time the server is started after installation, run the service with the following command:
systemctl start sballd
Service Restart
If the service has already been launched and for some reason is in Down status, use the following command to restore it to Up status:
sballd -r
Waiting for Process Completion
After executing the command, wait a few moments for the service to complete the startup process.
With the following command, you can view the current SBALL status:
pvm --status
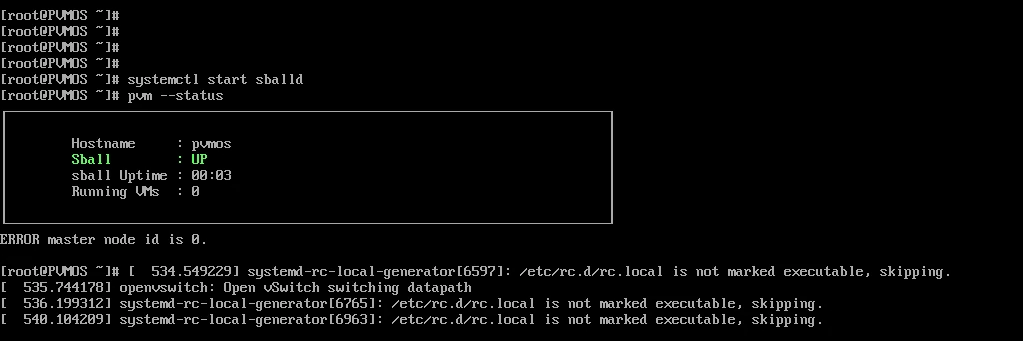
To re-check the status, enter the command pvm --status again.

During this process, the service status may be displayed as quorating. After completing operations, the status should change to quorate, indicating service readiness and activation of virtualization capabilities.

Before continuing configuration steps or creating virtual machines, ensure that the service status has changed from quorating to quorate.
After successfully launching the sballd service, the Plaivid management interface will be accessible via the address https://<IP>/plaivid:

Here, <IP> is the same Management IP that you configured for the system during the sbone configuration step.
At the first launch, the following default account is created automatically:
| Username | Password |
|---|---|
manage | manage |
PVM Software Repositories
After installing Plaivid, PVM software repositories are automatically configured on the system. These repositories provide the ability to install, update, and receive software packages via DNF/YUM.
Software Repository Address:
https://repository.cloudavid.com
To ensure repositories are active, execute the following command:
dnf repolist
If configured correctly, Repositories related to PVM will be displayed in the output of this command.
The Repository configuration file is also located at the following path:
/etc/yum.repos.d/pvm.repo
Installing or Updating PVM Package Groups
To install or update PVM package groups, use the following commands:
dnf group install pvm-release
dnf group upgrade pvm-release
Before installing or updating, ensure the server is connected to the Internet and has access to the CloudAvid Repository software repository.
License
After the installation is complete, Plaivid is activated with a default license, allowing you to use its virtualization features for initial deployment and evaluation.
For detailed information about the licensing model, concurrent usage limits, default service capacity, license upgrades, and obtaining additional licenses, refer to the following documentation.
End of Base Settings
Now the system's initial configuration has ended successfully. During the Sbone setup process, the Management IP address you entered has been applied to Plaivid Manager automatically. From now on, simply enter the server's Management IP address in your web browser to access the Plaivid Manager management interface and continue management and configuration operations through the web environment.